When it comes to building mass, a full-body workout is a key strategy that many bodybuilders often overlook. In addition, machines are an underutilized tool within the fitness community. Understanding the importance of both is crucial. It is worth noting that our muscles thrive when subjected to tension. By incorporating stress through various means such as barbells, dumbbells, and machines, we can effectively stimulate muscle growth.
While each approach has its advantages and disadvantages, both free weights and machines play significant roles in achieving your mass-building goals. If you prefer not to use machines and want to optimize your routine, read our guide on why you should train your full body everyday.
The fact remains that your body will build muscle if you consistently do more work over time. Moreover, if you have been doing the exact same free weight exercises for several months, your training will get stale. Even if you are not overtraining your muscles, the amount of muscle you build depends entirely on the amount of work you are doing. Switching from free weights to a machine variation for a few months will help rebuild that adaptive proclivity once you become too efficient at a particular movement.
Now that we have established the validity of using machines as part of your training, let us look at formulating a routine. We can easily formulate a highly effective full-body workout using just machines. Movement patterns and muscles are all the same, so you can easily adjust them as you need. It is just an example of a full-body structure that you can modify. Specific exercises can be determined by your available equipment and your personal preferences.
If your goal is comprehensive muscle engagement without constantly jumping between multiple single-station setups, investing in dedicated all-in-one equipment is a game-changer. To see how these versatile systems can revolutionize your home routine, check out our complete guide to full body workout machines.

Exercise 1: Chest press machine
The chest press machine is a horizontal pressing movement that targets the entire chest as well as other pushing muscles, such as the anterior deltoids and the triceps. In this example, as well as in all the others in this workout, you should choose a challenging weight. Pick a weight that you can use for exactly 12 repetitions with one rep left in your tank. For a total of four sets, you will need to perform this exercise. You can spice things up a bit by performing two drop sets to complete muscular failure for the last set.
A good rule of thumb is to rest between sets for 60 to 90 seconds, and take 2-3 minutes of rest between different exercises. The movement should be performed explosively with a controlled eccentric phase. There should be no pauses at the top or bottom of each rep, nor should there be pauses between sets. In other words, take one second on the way up and two or three seconds on the way down. Sounds simple enough, right? Let’s give the chest a break and move on to the next exercise.

Exercise 2: Smith Machine Squat
As the body descends, the hips and knees must hinge simultaneously. During a proper parallel squat, your hip crease will horizontally align directly with your knee joint. By using a wide variety of bars, dumbbells, and machines, you can do the squat movement with either a single leg or both legs. The squat movement pattern is highly comprehensive, which perfectly allows for more inclusive exercise variations. If you do not have a Smith machine, or simply want to avoid single-leg squats and leg presses, a dedicated squat machine is a great option. For a deeper dive into maximizing this equipment, review our guide on Smith workout machines.

Exercise 3: Leg Curls
We will begin by crushing the quads with a heavy squat movement before we target the hamstrings with a seated leg curl. It is important to keep your upper body locked in for this specific machine variation. You will only bend at your knees since you are securely seated. Seated leg curls stretch the hamstrings further, making them highly effective. However, if you do not have access to a seated machine, you can easily substitute it with a lying leg curl. For the next compound exercise, let’s move back to the upper body.
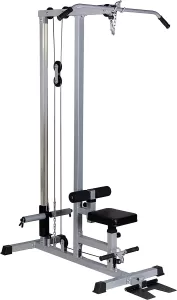
Exercise 4: Lat pulldowns
We are going to do a lat pulldown as our primary pulling movement. It is a vertical pull that emphasizes the lats but also trains the back as a whole. A Journal of Strength and Conditioning Research study closely examined different hand grips on lat pulldowns. These variations included a V-bar with neutral hands, an underhand grip similar to a chin-up, a wide overhand pull-up grip, and an overhand behind-the-back pulldown.
When you pronate your grip in front of your body, your lats get the most muscle activation. If you are wondering what grip to use, modern research suggests a medium grip is better than a narrow or wide grip. This is primarily because the eccentric portion of the exercise activates more muscle fibers. If you want to safely change things up, try a horizontal pull instead of this vertical pull. This acts much more like a standard row than a pulldown. With the horizontal pull, you will focus more on your mid-upper back while still effectively engaging your lats.

Exercise 5: Wide grip upright row on the Smith machine
There is no doubt that the upright row is a great exercise for primarily targeting the traps. However, because of the degree of shoulder abduction, the upright row can also be very effective for targeting the mid-delts as well. The key is to raise the heavy bar only up to 90 degrees with your elbows positioned slightly below. As a result, we included this exercise since it effectively targets both the upper traps and the mid-delts to a significant extent. Research has shown that the wider your grip goes, the more the focus shifts from the biceps to the mid-delts. Conversely, going too narrow will cause excessive internal rotation and may quickly result in shoulder impingement. Apart from that, the amount of shoulder abduction does not change at all.
If you use a narrower grip, you will just put more strain on the traps, involve the biceps a bit more, and risk severe injury. Instead, go a bit wider with your hands. The grip width should be just wide enough that at the top you can comfortably have about 90 degrees of elbow flexion. In addition to being able to load it more heavily, proper biomechanics mean it heavily targets the mid-delts. The physical tension dangerously shifts to the rear delts if you go any wider than this. If you do not have access to a Smith machine or just want an alternative, try the machine lateral raise. It is a good idea to include an exercise that loads horizontal abduction since the mid-delts are otherwise understimulated.
To fully develop your upper body and add mass to your arms, isolating the back of the arms is just as important as heavy compound pulling movements. Incorporating a dedicated machine tricep press into your routine ensures you can safely overload the muscle with perfect form to maximize hypertrophy. For complete, balanced arm development, pairing this with a bicep curl machine will perfectly round out your isolation work.
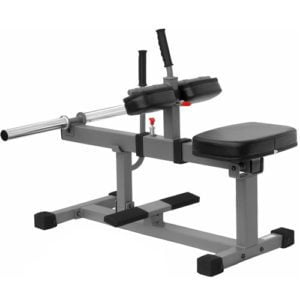
Exercise 6: Standing calf raises
There are two main muscles located in the calves: the soleus and the gastrocnemius. The gastrocnemius crosses both the knee and ankle, but the smaller soleus only crosses the ankle. You cannot create as much muscular tension with the gastrocnemius during seated calf raises, so the soleus takes over completely. Unfortunately, the soleus is not very big and does not contribute heavily to overall calf size when you train them. Trying a standing variation with your legs straight is the best way to significantly grow your calves. This will make sure you are actively working the gastrocnemius, which is the exact muscle responsible for calf size. Plus, because the gastrocnemius is more active during this standing movement overload, it is easier to safely execute.
If you are looking for a highly effective full-body workout for mass, incorporating a leg press machine can be a fantastic alternative to a standing calf raise machine. Even without access to specialized equipment, you can still seamlessly engage in a simple yet powerful full-body exercise routine completely using only machines. While it is undeniably important to include free weights in your daily training regimen for functional strength, incorporating dedicated periods of exclusive machine training can be highly beneficial. It allows you to safely explore diverse training methods and new physical stimuli. This easily kickstarts your muscle growth in a highly unique and effective manner.
Leave a Reply